2024. 5. 9. 17:53ㆍ뜨개일기
https://knitdoc.tistory.com/m/48
[대바늘뜨개질] 영어도안 독학 도전기 - 영문도안 독학 Drops 도안
날씨가 더워져서 슬리브리스를 하나 뜨고 싶어짐 전부터 눈여겨봤던 DROPS 에 있는 이 도안으로 결정 DROPS 239-18 DROPS design: Pattern w-888 클릭시 링크로 이동 도안은 무료도안! 웹사이트에서 도안을
knitdoc.tistory.com
지난 글에 이어서 영문도안 뿌수는 법
포스팅해보겠음
영문도안은 뜨개질 용어만 잘 알아두면
너무 쉬우니까
걱정말고 이 글을 천천히 읽어보도록 하자
아마 웬만한 영문 도안은 이 선에서 다 해결될듯
참고로 도안 링크
Drops
https://www.garnstudio.com/pattern.php?id=11368&cid=19
Kongletopp / DROPS 239-18 - Free knitting patterns by DROPS Design
Knitted top in DROPS Paris. Piece is knitted top down with lace pattern and garter stitch. Size XS/S – XXXL.
www.garnstudio.com

이제 옷을 본격적으로 만드는 단계
TOP - SHORT OVERVIEW OF THE PIECE:
대략 어떤 순서로 옷이 만들어지는지 설명
Work back piece and front piece back and forth, top down separately.
탑다운 평면뜨기로 앞판과 뒷판을 따로 만든다.
*back piece : 뒷판 / front piece : 앞판
back and forth : 앞뒤로. 즉 평면뜨기
top down : 위에서 아래방향으로 뜨는 탑다운기법
First work the straps, then cast on stitches for neck between straps, and work back piece/front piece back and forth separately until armholes are done.
먼저 어깨끈을 작업하고, 두 개의 끈 사이의 목선을 위한 코를 잡아주며, 암홀 부분 뜰 때까지는 앞판과 뒤판을 따로 작업해준다.
*cast on : 코를 잡다
Then put back piece and front piece together and work body in the round until finished measurements.
그 뒤 앞판 뒤판을 합쳐서 끝까지 원형뜨기한다.
*work in the round : 원형뜨기
Sew straps together on the shoulders.
어깨 끈을 꼬매준다.
RIGHT STRAP AT THE BACK (when garment is worn):
옷 입었을 때 기준 뒷판 오른쪽 어깨끈
*garment : 편물, 옷
Cast on 9-9-11-11-13-13 stitches on double pointed needles size 4 mm with DROPS Paris.
4mm 장갑바늘로 사이즈에 따라 9-9-11-11-13-13코 잡기
*stitch : 코
double pointed needle : 장갑바늘
Work rib back and forth as follows( first row = right side): 1 stitch in GARTER STITCH - read explanation above - * knit 1, purl 1 *, repeat from *-* 3-3-4-4-5-5 times in total, knit 1, 1 stitch in garter stitch.
다음과 같이 고무뜨기 해준다 (1단 = 겉면)
한코 가터뜨기, *겉뜨기1, 안뜨기1*
*겉뜨기1,안뜨기1* 을 사이즈에 따라
총 3-3-4-4-5-5회 반복하고
겉뜨기1, 가터뜨기1 해준다.
*work rib : 고무뜨기
row : 단. 즉 first row는 1단
right side : 겉면
knit : 겉뜨기
purl : 안뜨기
garter stitch : 가터뜨기
When strap measures 5-6-7-5-6-7 cm and last row is worked from wrong side, put strap aside.
어깨끈을 사이즈별로
5-6-7-5-6-7cm까지 뜨고
마지막 단이 안쪽면에서 끝났다면
어깨끈을 잠시 쉬게 둔다
*wrong side: 안쪽면
put aside : 편물을 쉬게 두다
LEFT STRAP AT THE BACK (when garment is worn):
옷 입었을 때 기준 뒷판 왼쪽 어깨끈
Cast on the same number of stitches as on right strap at the back and work the same way as right strap at the back.
오른쪽 끈이랑 똑같은 코수 잡고 똑같이 작업한다
When strap measures approx. 5-6-7-5-6-7 cm and last row is worked from right side, slip stitches on circular needle size 4 mm.
어깨끈이 5-6-7-5-6-7cm 정도이고 마지막단이 겉면에서 끝나면 줄바늘 4mm로 코들을 옮겨준다.
*circular needle : 줄바늘
Do not cut the yarn but cast on 31-41-37-37-43-43 new stitches at the end of this row for neck, then work stitches from right strap as before = 49-59-59-59-69-69 stitches on needle.
실 자르지 말고 여기서 사이즈별로
31-41-37-37-43-44코 잡아준다. 이는 목선이 된다.
그리고 오른쪽 strap을 떠와서
바늘에 최종적으로 49-59-59-59-69-69코
걸려있게 해 준다.
*yarn : 실
Insert 1 marker here - now measure piece from here!
여기에 마커를 걸어주고
여기서 길이를 측정해준다.
BACK PIECE:
뒷판
Work rib back and forth as before over all stitches as with 1 stitch in garter stitch in each side.
편물의 양끝 1코는 가터뜨기, 나머지는 고무뜨기
When rib measures 3 cm from marker and next row is worked from right side, switch to circular needle size 5 mm.
고무뜨기단이 아까 걸어둔 마커로부터 3cm가 되면
다음 단은 겉면에서 시작되게 해두고
편물을 5mm 줄바늘로 옮겨준다.
Work next row as follows from right side: 1 stitch in garter stitch, knit 1, purl 1, knit until 3 stitches remain on row, purl 1, knit 1, 1 stitch in garter stitch.
겉면에서 이렇게 작업한다 : 가터뜨기1, 겉뜨기1, 안뜨기1, 마지막 세코 남을때까지 겉뜨기, 안뜨기1, 겉뜨기1, 가터뜨기1
Knit from wrong side but work the outermost 3 stitches in each side in garter stitch and rib as before.
안쪽면에서도 겉뜨기해주는데 양끝 세 코는 이전 단에서 했던것처럼 가터뜨기와 고무뜨기 해준다.
Now the pattern begins.
이제부터 무늬를 뜨기 시작한다.
*pattern : 무늬
Work first row as follows from right side: 1 stitch in garter stitch, knit 1, purl 1, work A.1A, work A.1B 3-4-4-4-5-5 times in total, A.1C, purl 1, knit 1 and 1 stitch in garter stitch.
겉면에서 시작한다 : 가터뜨기1,겉1, 안1 뜨고 A.1A, A.1B 3-4-4-4-5-5회 반복, A.1C, 안1,겉1, 가터뜨기1
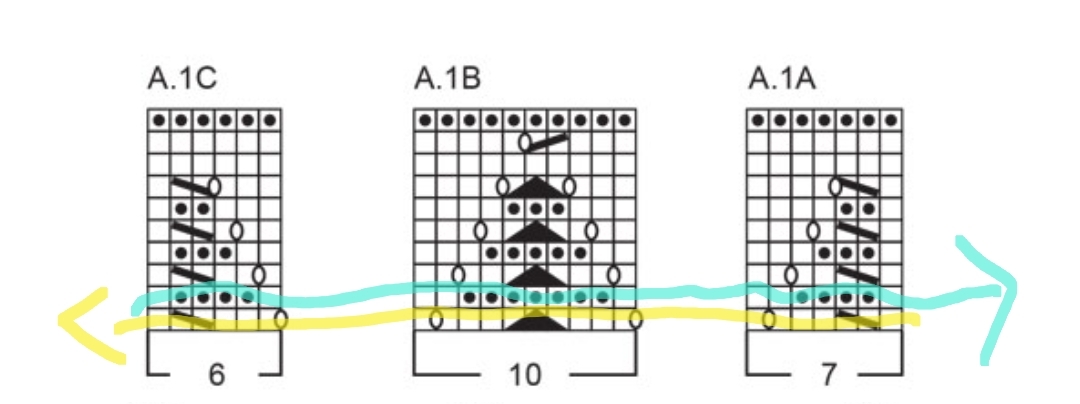
참고로 기호도안은 이렇게 나와있음
평면뜨기니까 이런 방향대로 보면 되겠다
When A.1 has been worked vertically, begin increase for armhole. Work first row as follows from right side: 1 stitch in garter stitch, knit 1, purl 1 A.2A, work A.2B 4-5-5-5-6-6 times in total, A.2C, purl 1, knit 1 and 1 stitch in garter stitch.
A1 끝나면 암홀 늘리기를 시작한다.
겉면에서 시작되며 가터1,겉1,안1 후 A.2A, A.2B를 4-5-5-5-6-6회 반복, A.2C,안1,겉1,가터1
AT THE SAME TIME on row marked with arrow in A.2, cast on 4-4-7-7-7-12 new stitches for armholes at the end of these 2 rows = 65-75-81-91-101-111 stitches.
A.2 진행시 기호도안에서 화살표로 표시된 단 마지막에
4-4-7-7-7-12 코를 잡아준다. 이는 암홀이 된다.
바늘에는 총 65-75-81-91-101-111코 걸려있게 됨.

참고로 기호도안의 화살표는 요런식으로 표시해준다.
Piece measures approx. 16-17-18-20-21-22 cm. Put piece aside and work the front piece.
이제 편물 길이는 약 16-17-18-20-21-22cm.
편물은 쉬게 두고
이제 앞판을 작업한다.

본 도안에서 제시하는 기호들
각각 살펴보면

겉면에선 겉뜨기, 안면에선 안뜨기

겉면에선 안뜨기, 안면에선 겉뜨기

두 코 사이에 바늘비우기 1회
*yarn over : 바늘비우기

k2tog = 두 코 함께 겉뜨기

겉뜨기방향으로 1코 걸러뜨고 다음코 겉뜨기
걸러떴던 코로 겉뜨기한 코 덮어씌우기
*slip 걸러뜨기
*pass stitch over stitch worked : 덮어씌우기

겉뜨기방향으로 1코 걸러뜨고 두코 함께 겉뜨기
걸러뜬 코로 k2tog 코 덮어씌우기
요까지해서 만들어진 결과물

짜잔
영문도안 사실 별 거 없다!
이제 이 글 봤으니까 뭐든 해낼 수 있을 것임
화이팅
'뜨개일기' 카테고리의 다른 글
| [대바늘뜨개질] 리본홀터넥 - 아이코드와 더블니팅 (블루스쿼럴 윰 님 도안) (3) | 2024.06.28 |
|---|---|
| [대바늘뜨개질] 영어도안 독학 도전기 - 영문도안 독학 Drops 도안 -3 (완) (4) | 2024.06.11 |
| [대바늘뜨개질] 영어도안 독학 도전기 - 영문도안 독학 Drops 도안 (0) | 2024.05.06 |
| [대바늘뜨개질] 머쉬룸디자인(뚜장군님) - 스모어딥집업 part2 (1) | 2024.05.02 |
| [코바늘뜨개질] 누가 수세미 입문용이라고 했냐 (2) | 2024.04.25 |